This is an old revision of the document!
Table of Contents
Configuration
Article Factory Manager is a very useful tool for any article driven sites. As the title inspires it is an article manager with various features, like management of the articles, edit, delete, publish, etc. It also provides an Approval System where designated approvers can moderate submissions and publish or reject them accordingly, a Mail System that sends notifications and a Revision System to edit and restore versions of the same article.
You can manage all these things and many more from the Configuration page by going to Components/Article Factory Manager/Articles and clicking on the Options button from the toolbar.
Take a moment to configure and save the configuration on your first install, some settings are required in order for the component to function to your benefit. For example, if you use the K2 extension, setting this is quite important and only requires 5 seconds to click and save. Starting with version 4.1.0, this setting is located in the Submission tab.
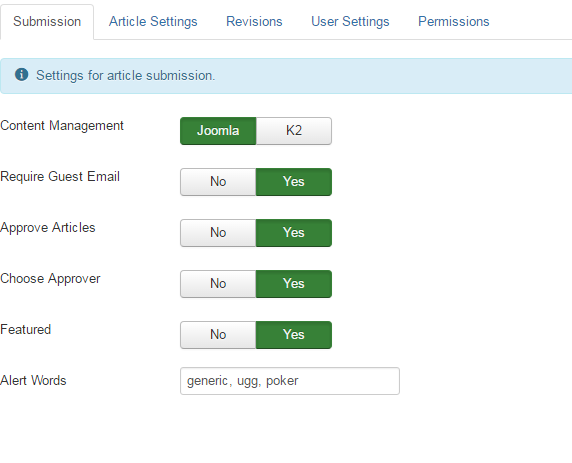
Submission
Choose which Content Management extension should be user for storing content.
Warning: The K2 Extension must be installed for K2 integration, available at www.getk2.org ! Enabling K2 Content without installing it will lead to errors and unexpected behaviour.
Since you can allow guest/public users to add articles, you can also enable the Require Guest Email option which will make the email address field compulsory, it also checks for a valid email format.
With Approve Articles enabled, articles added by users with 'Submit' permissions will require approval before being published. From the Permissions tab however, you can allow auto-approval for certain user groups by giving them 'Create' permissions.
Choose Approver will enable a field where users can select the approver for their articles. However, category restrictions have priority and this setting will be ignored if the approver is restricted in the chosen category.
You can allow users to set their articles as Featured when adding them with this option enabled. A similar option is found on the Permissions tab where you can enable it only for certain groups. This setting will override the permission if disabled.
On the Alert Words field you can blacklist various words. If any of these words are present in the article, they will be shown in the Approval Form separately. Approvers can then take the required action either rejecting the article or editing the content and removing the words.
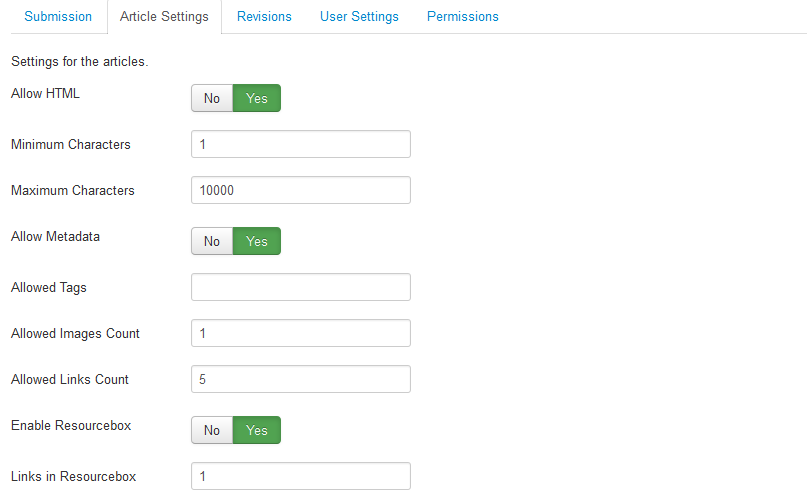
Article Settings
Setting Allow HTML to No will filter any HTML tags added in the articles. It is recommended that you also disable the Joomla editor plugin if this option is set to No.
Set values for the Minimum and Maximum number of characters needed when submitting new articles. Not meeting these requirements when submitting an article will display a warning for the respective user and refuse the submission.
You can give users the possibility to set Meta description and Meta keywords for an article with the Allow Metadata option.
Use the 'Allowed Tags' setting to set which HTML tags to be allowed separating them by commas, all other tags will be stripped. Leave the field empty for no restrictions.
Set values for Allowed Images Count and Allowed Links Count, the submission will be denied when these values are exceeded.
With Enable Resourcebox users will be able to set a signature text and avatar, these being attached to the article. When creating the article, users will be able to append the resource box either on top or bottom of the article, also within the resource box, the Avatar can be aligned to either left or right. There is also an option to update the general Resource Box with every save if desired.
Regarding the Resourcebox you can also add how many Links to be allowed on it. Set 0 for none.
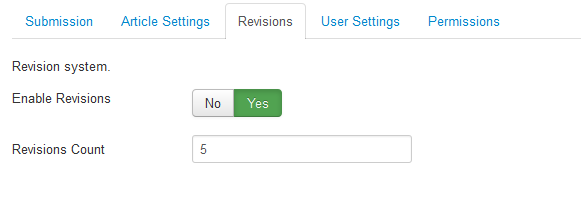
Revisions
A Revision system for articles is implemented with the component and you can enable it from this tab. When articles are edited and saved, the revised version is saved separately instead of overwriting the article. This allows users and approvers more flexibility when editing content. For one, the revisions will require approval before publishing the changes to a live article; and a restore will also be available.
From here you can also set the Revisions Count which is the maximum amount of stored revisions in the database for each article. When a new revision is created, if the revision count exceeds this limit, the oldest revision is deleted.
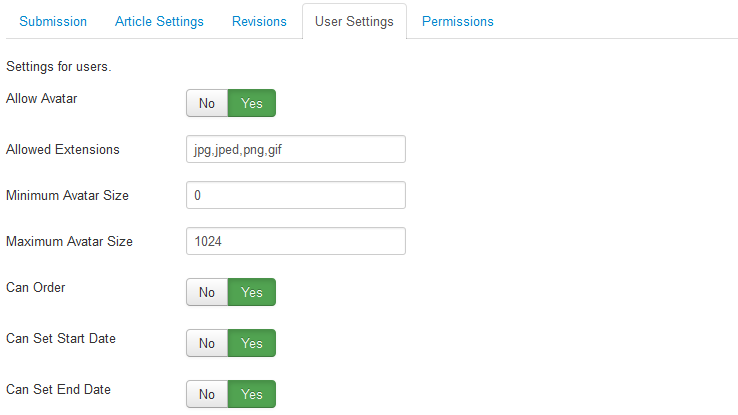
User Settings
Enabling Allow Avatar will let users to upload avatars which will be displayed on the Resourcebox, in case this feature is enabled.
You can define the avatars by setting the Allowed Extensions (for example "jpg, gif, png") or by making them mandatory by setting any value above 0 on the Minimum Avatar Size field. Furthermore, you can also set the Maximum Avatar Size in kB which will limit users to upload avatars smaller in size than the set value.
Can Order allows users to set the ordering of their articles within the categories. New articles default position will be first in their respective category, the ordering field being available after saving.
You can also enable fields for users where they can set the Start Date and End Date of publishing their articles. Be sure to take note of time offsets if articles seem not to publish instantly.
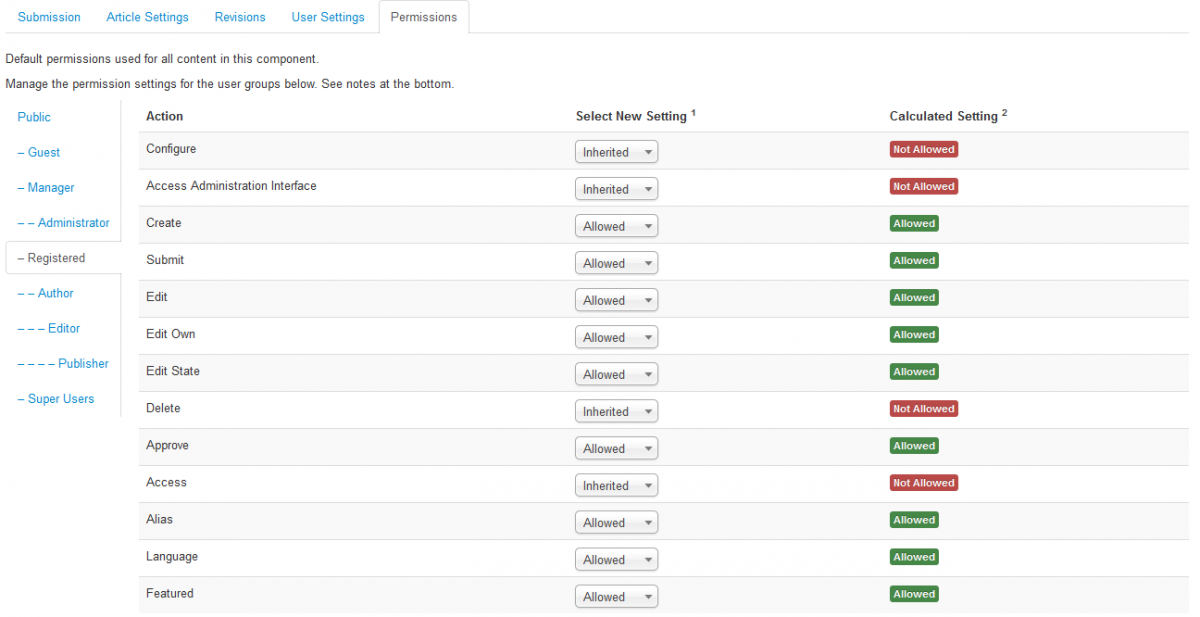
Permissions
As an administrator you can manage the Permissions settings by allowing or denying access to various actions for certain users groups.
On the left side of the page you will be able to select the user group and view its settings, by changing a setting for one of the actions, you will need to Save to refresh the calculated settings.
Changing one of the settings for a user group it will apply it to this and all child groups. While with Allowed the group being edited will be able to take this action and with Denied the group will be unable to perform that respective action, Inherited means that the permissions from the parent group will be used.
Here is a complete list of the actions on which you can manage the permission settings and a short description about them:
- Configure - allows users from the selected group to edit the options of this extension.
- Access Administration Interface - allows users from the selected group to access the administration interface for this extension.
- Create - allows users from the selected group to publish articles without requiring approval. With Approve Articles option disabled from the Submission tab however, this becomes irrelevant.
- Submit - allows users from the selected group to write articles which will be reviewed by an approver.
- Edit - allows users from the selected group to edit any content in this extension.
- Edit Own - allows users from the selected group to edit any content they submitted in this extension. The Edit option being enabled will override this.
- Edit State - allows users from the selected group to change the state to either Published/Unpublished/Archived or Trashed of any content in this extension.
- Delete - allows users from the selected group to delete any content in this extension.
- Approve - allows users from the selected group to approve or reject articles. Users can do this only for articles in categories they have access.
- Access - allows users from the selected group to set the article Access Level.
- Alias - allows users from the selected group to set the article Alias.
- Language - allows users from the selected group to set the article Language. With this being disabled it will automatically assign new articles to All the languages.
- Featured - allows users from the selected group to set articles as featured. With the Featured option disabled from the Submission tab however, this becomes irrelevant.
(!) Make sure your user groups have 'Create' permissions in the desired categories, set from the Joomla content component.
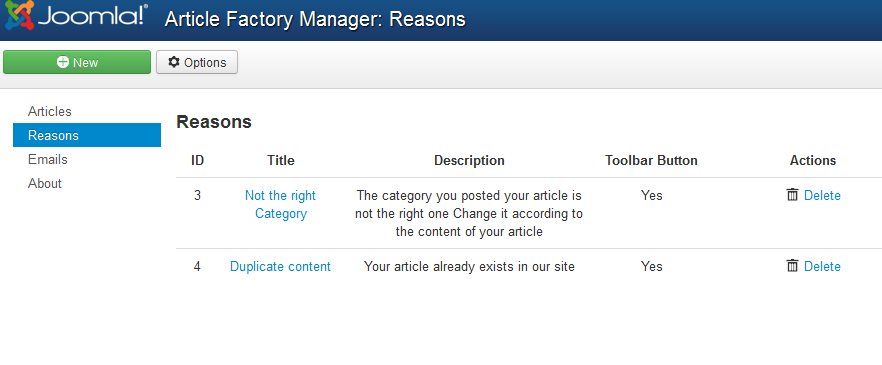
Reasons
Approvers can choose from a defined list of reasons when they reject articles. The author will be informed about why his articles has been rejected.
The extension comes with 2 default reasons but you can also add additional ones by clicking on New and adding a title and description for another reason. With In Toolbar set to Yes, a reject button will be displayed on the backend and the frontend approve form, with this reason for quick use. Instead of using the select box and clicking Reject.
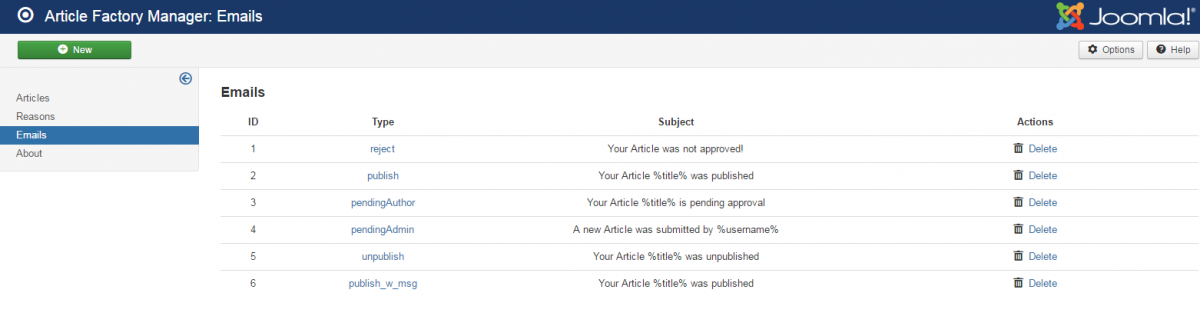
Emails
An Emails system is available which will notify authors and approvers of various actions.
From this page you can manage these notifications by editing them, deleting or creating new ones.
Here is a list of the notifications that come along with the installation of the extension:
- Reject - sent to Author when his article was not approved. This can also include the reason of rejection available on the Reasons page.
- Publish - sent to Author when his article has been approved and published.
- PendingAuthor - sent to Author when his article is pending approval.
- PendingAdmin - sent to Approver when a new article has been submitted which is waiting his approval.
- Unpublish - sent to Author when his article was unpublished.
- Publish with message - sent to Author when his article has been approved and published, along with an extra message.
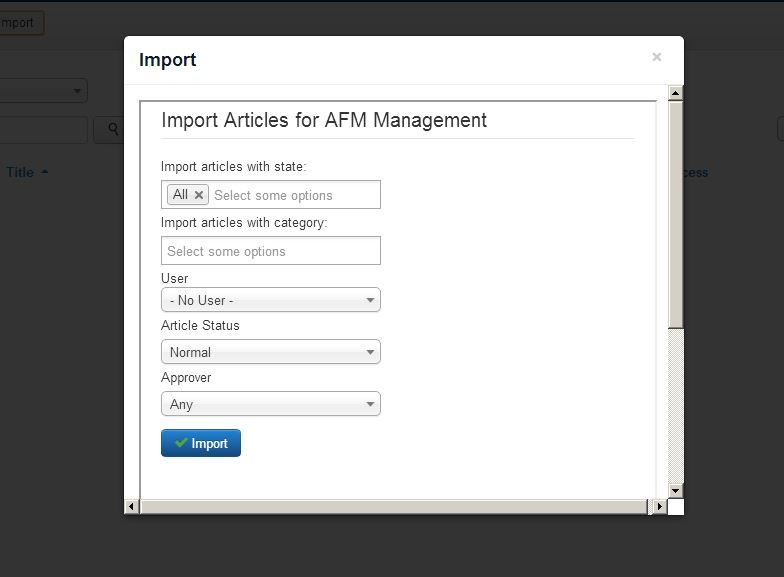
Import Articles
Starting with version 4.1.0, there is also an option to import articles for management in Article Factory Manager. What this means is that you will be able to install our extension later on even if you have already published content on your website. This tool will allow you to create references in our component, allowing you to easily transition from Joomla article management into Article Factory management.

Articles will be imported based on the setting you have in "Submission/Content Management" from either Joomla or K2.
The following options are available in the import form:
- Import articles with state - This will only import the articles which have the set state, to import all articles leave it on the default "All" setting. Note that if "All" is selected among other options, All will be imported.
- Import articles with category - This will only import the articles which have the chosen category. You can leave it empty to ignore this filter.
- User - You can choose to import articles only from a specific user. - No User - will import articles from all the Joomla users.
- Article Status - Set with which status the articles will be imported. Note that if you import Published articles as Rejected, their state will not be modified and will remain published.
- Approver - Set an approver for the imported articles, this can be left empty and all approvers will be able to manage them.
Click import and start managing all of your content with Article Factory Manager. Refresh the AFM Articles List to see imported content.
K2 Integration
Having K2 integrated along with Article Factory Manager allows you to set user group permissions for the available categories.
To do so, go to K2/User groups from the menu and click on New to create a new user group.
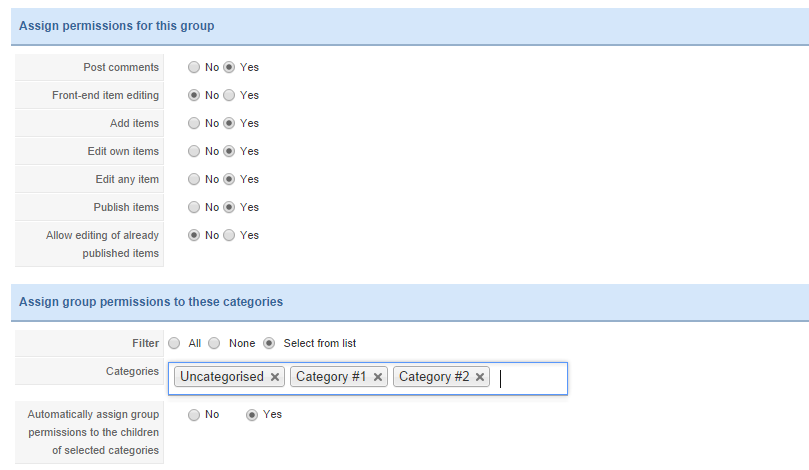
After you set a name, you can assign various permissions for this group:
- Post comments
- Front-end item editing
- Add items
- Edit own items
- Edit any item
- Publish items
- Allow editing of already published items
Further down below you can select the categories on which these permissions will be assigned. You need to set the K2 group permissions to 'Select from List' and specifically assign the desired categories and subcategories.
ReCaptcha Integration
With ReCaptcha you can avoid unwanted spam, the plugin will require users just a single click in order to confirm they are not a robot.
To use ReCaptcha when creating new articles, you will need to do the following:
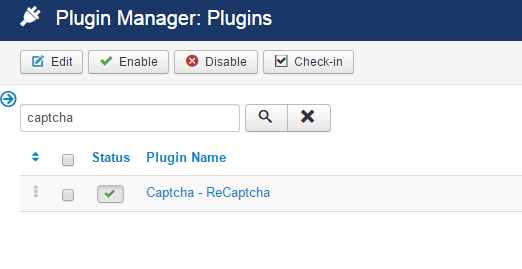
1). Go to Joomla Backend/Extensions/Plugin Manager and locate the ReCaptcha plugin.
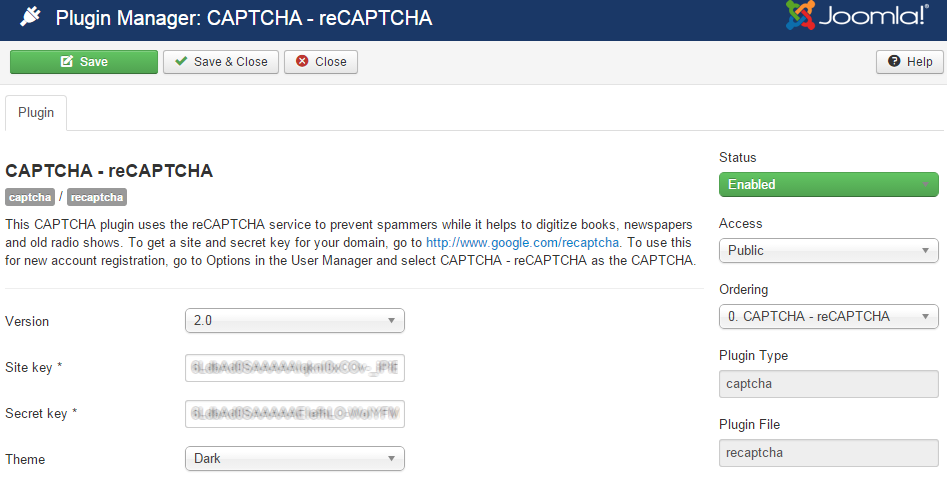
2). Set Version to 2.0 and add a Site key and a Secret key.
You can obtain these 2 keys from http://www.google.com/recaptcha
Additionally you can change the display of the plugin on frontend by choosing a Dark or a Light Theme.
Enable the plugin and save the changes when you are done.
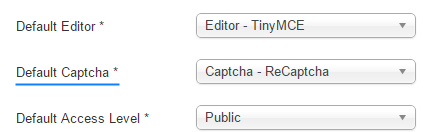
3). Now go to the System/Global Configuration, and set the Default Captcha field to "Captcha - reCaptcha".
4). Now you should see a ReCaptcha validation on the front end article form of Article Factory Manager.

(!) Documentation based on Article Factory Manager version 4.2.1