Table of Contents
Setting up Candidates and Companies
Upon installing the component, you will need to follow some simple steps in order to have a fully operational recruitment system for both Candidates and Companies.
Backend
First and foremost, you should create the groups of candidates and companies and to configure the Access Control List for them appropriately.
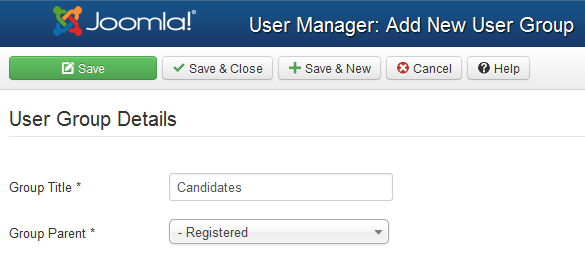
- 1. From Joomla's Administrator Menu go to Users and choose Groups section to define Companies and Candidates groups.
There, add two new groups, their names can be Companies and Candidates but you can also set your own names if you wish so.
Group Parent for both of them must be Registered.
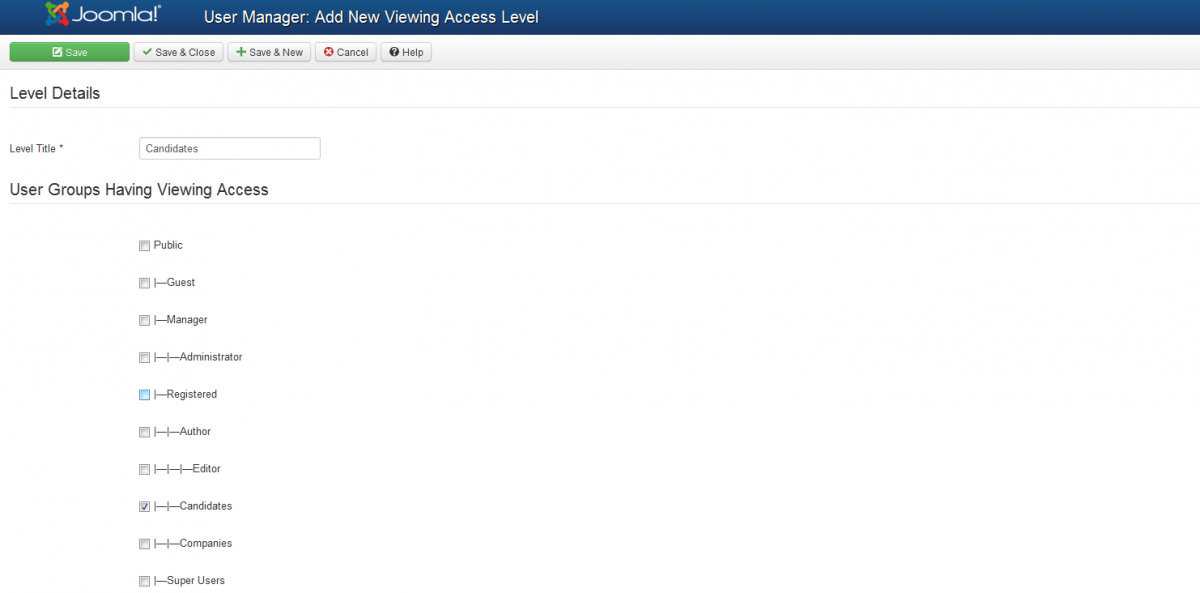
- 2. Define two new Viewing Access Levels for the newly created groups.
First access level:
Level Title - Companies
AND check 'Companies' in the list 'User Groups Having Viewing Access'.
Second access level:
Level Title - Candidates
AND check 'Candidates' in the list 'User Groups Having Viewing Access'.
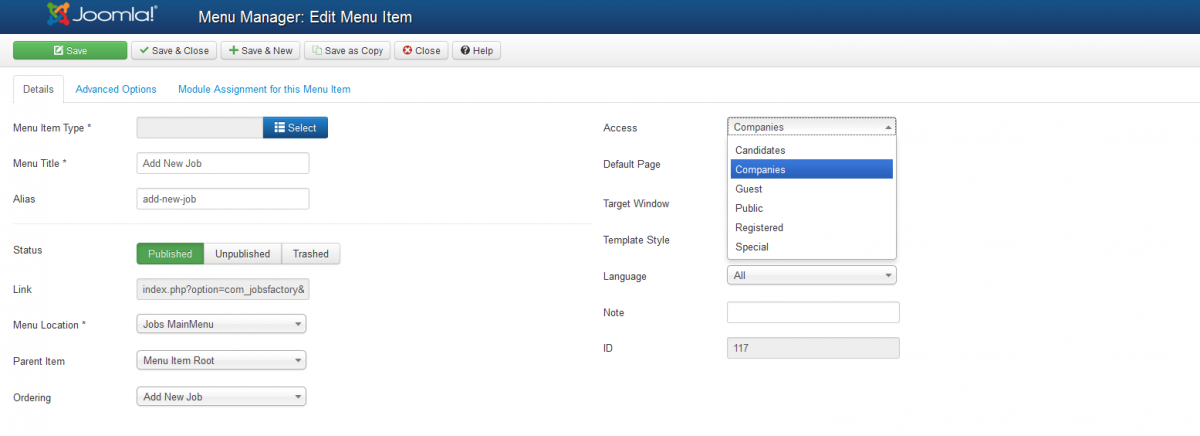
- 3. From Joomla's Administrator menu go to Menus/Menu Manager and click on Jobs MainMenu.
Set access level group to 'Companies' for menu items: 'Add New Job', 'Candidates List', 'My Jobs Openings'.
For 'Companies List' menu item set access Public or Registered, as you consider.
Set access level group to 'Candidates' for 'Applied List' menu item.
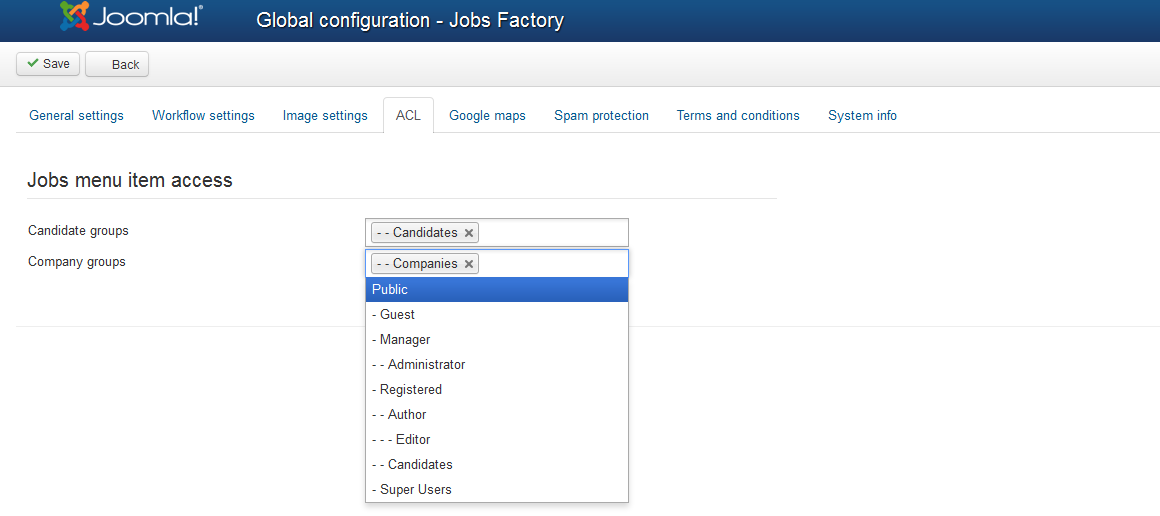
- 4. From Jobs Factory's menu go to Settings/General Settings and click on the ACL tab to set Jobs menu item access for groups:
On the 'Candidate groups' add 'Candidates' by clicking on the text field and choosing it from the drop down list.
Do the same for 'Company groups' by choosing 'Companies'.
Afterwards click on 'Save'.
Creating an Account
Upon configuring the groups and the access levels, you should allow users to register on your website.
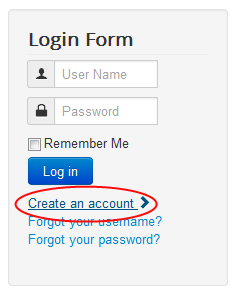
- 1. Registering can be done by both Companies and Candidates by clicking on Create an account from Joomla's login menu.
- 2. Fill in the necessary fields found on Joomla's registration form.

- 3. Now the user will need to be activated by either checking user's email address or from backend by going to User Manager.

Frontend as a Company
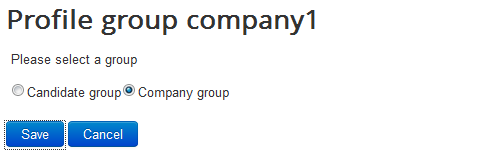
- 1. Now that your account is created and activated, you can log in with that user and click on the Profile link available on Jobs Factory Menu.
There you will be prompted about which group you wish to be part of, Candidates or Companies.
Select the Company group checkbox and click on Save.
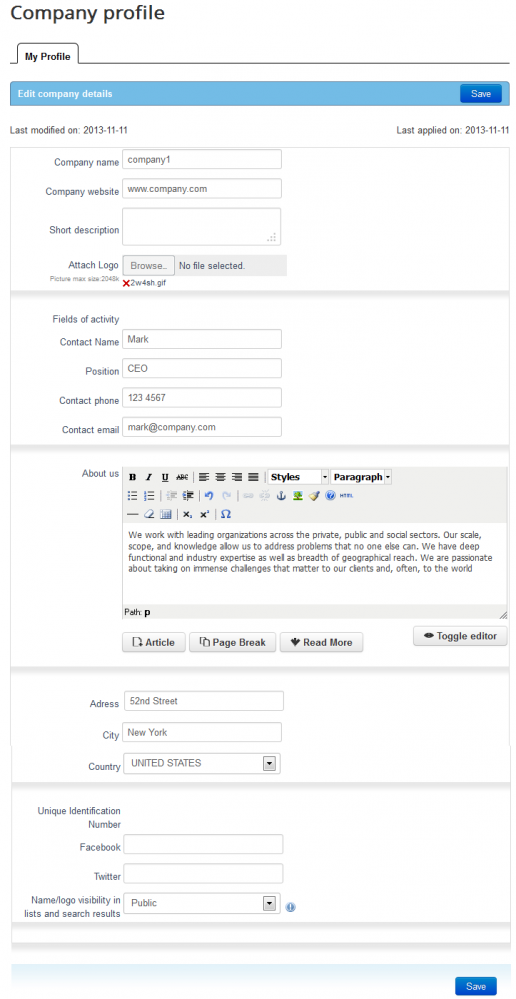
- 2. Before being able to add new jobs to the website you will need to specify additional details regarding your company such as a description, logo, contact phone, email, address and many more.
- 3. Now you will have access to all the menu items needed for a company, allowing you to add new jobs, view lists of your job openings or of the available candidates.
(!) Be sure to relog onto that respective user if the company menu is not displaying.
Frontend as a Candidate
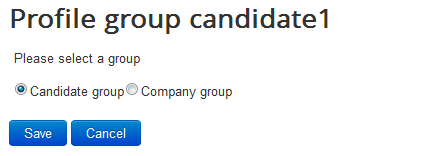
- 1. Having your account created and activated, you can log in with that user and click on the Profile link available on Jobs Factory Menu.
There you will be prompted about which group you wish to be part of, Candidates or Companies.
Select the Candidate group checkbox and click on Save.
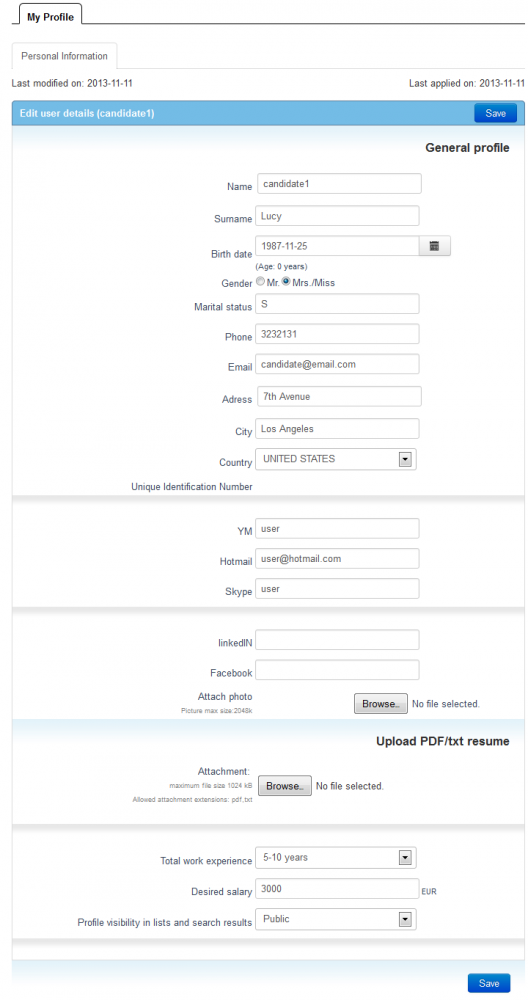
- 2. Before being able to send your application to one of the available jobs, you will need to add additional details such as your name, surname, gender, address, job experience, desired salary and many more.
- 3. Once you added enough details about you, you will be able to send your application to various job offers and to check the Applied List link from Jobs Factory Menu.
(!) Be sure to relog onto that respective user if the Applied List link is not displayed.
General Settings
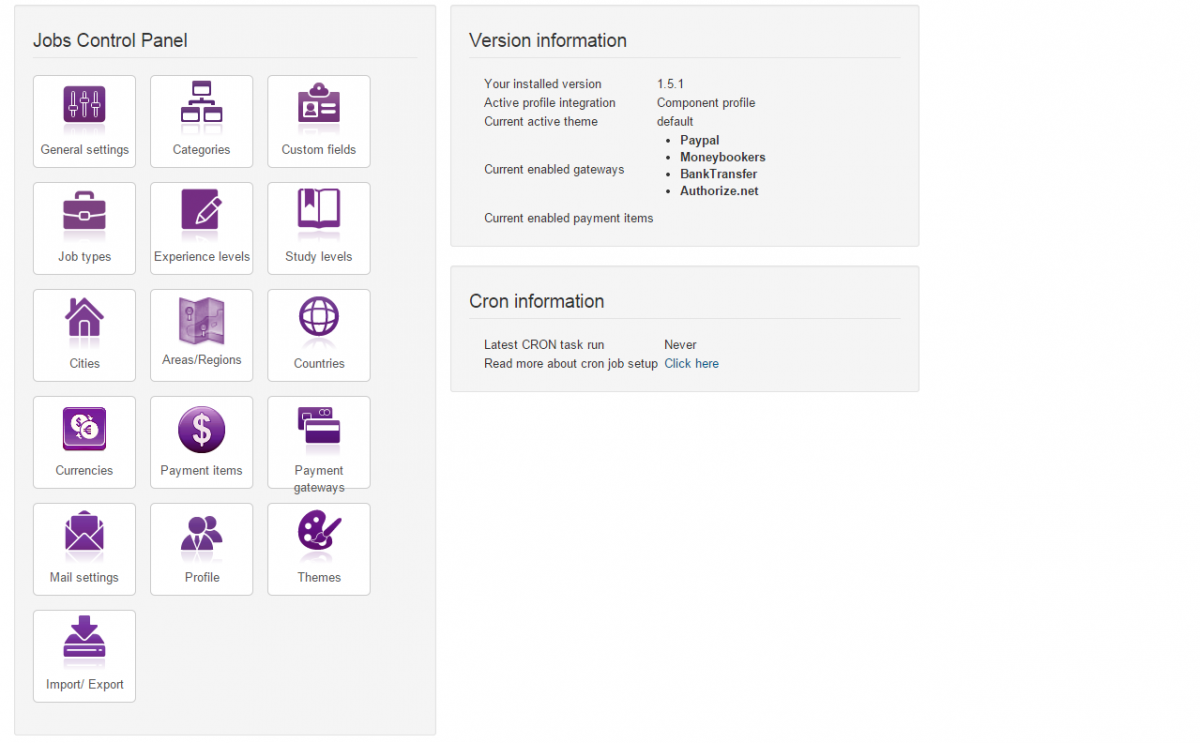
To edit most of the options available for Jobs Factory go to Components/Jobs Factory/Settings in the Joomla backend and click on General Settings.
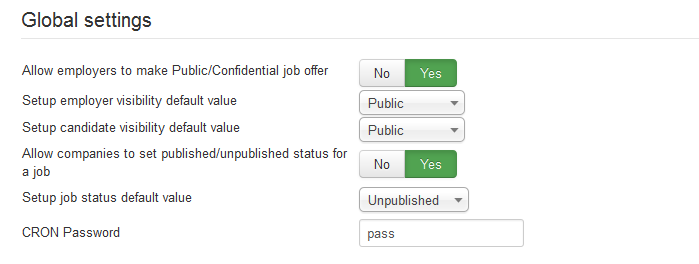
You can set to allow employers to make Public/Confidential job offers or to disable the option and to select below a default value for employer's visibility.
Choose from the drop-down menu a default value for candidates visibility in candidates list and search results.
You can allow companies to set the status of their job offers or to select below a default value which will apply to all new offers at posting.
Set a CRON Password which will be used to safely call the cron script.
From the Date Time Options area you can select the default formats for date and time available on the website. Next to the drop-down menus you can view how these formats are displayed with actual numbers.
Items per Page allows you to set the maximum amount of jobs visible on the listing pages.
Define how the prices will be displayed on the component by setting up the Number of decimals and the separator symbol for decimals and thousands.
User location management, if enabled, will let users select their state and city from a list with predefined locations instead of manually typing them.
You can choose to show the jobs from subcategories together in the listing with their respective parent category.
Enabling Job expiration hour allows users to specify an expiration hour for the job offers they post. If disabled, the offers will expire at midnight.
You can choose to display a Javascript Countdown for every job offer displayed on the website.
From the Listing settings area you can also set the maximum amount of time(in months) a job can be published as well as the amount of time it will be kept in archive before deleting it.
Listings can have tags attached to them, set here the maximum number of tags allowed per listing.

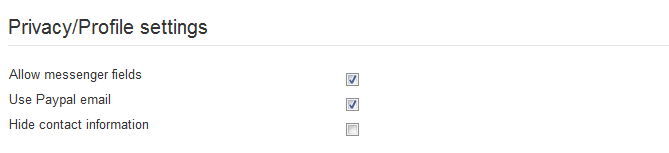
With Jobs Factory you can allow users to add contact information such as a messenger id or a PayPal email address. For user's privacy you can opt to hide these along with the address information on details and listing pages.
Job candidates and companies can upload files using our component for a detailed view of the respective candidates or job offers.
To allow candidates to upload PDF files or text resumes you will need to check the Enable resume attachment checkbox and to add the allowed file extensions.
For companies to be able to upload files you will need to check the Enable job offer attachment files checkbox and to add the allowed file extensions.
Set a maximum size of the files from the Max attachment size (kB) field.
Companies can be rated by candidates in order to differentiate them by their professionalism. Enable Allow users to rate companies for this feature to be available on front end.

Workflow Settings
From the Workflow Settings tab you can set up a couple of things regarding certain processes of the component.
You can choose between 2 ways the companies can post their job offers, one with a one step posting where all the job information is entered in one page, and another, that will require them to set the category first and then the rest of the information.
Besides ACL, listings can also be actively moderated. By enabling the Admin must approve every Listing, all job offers will need to be manually approved by an admin on the backend before publishing them.
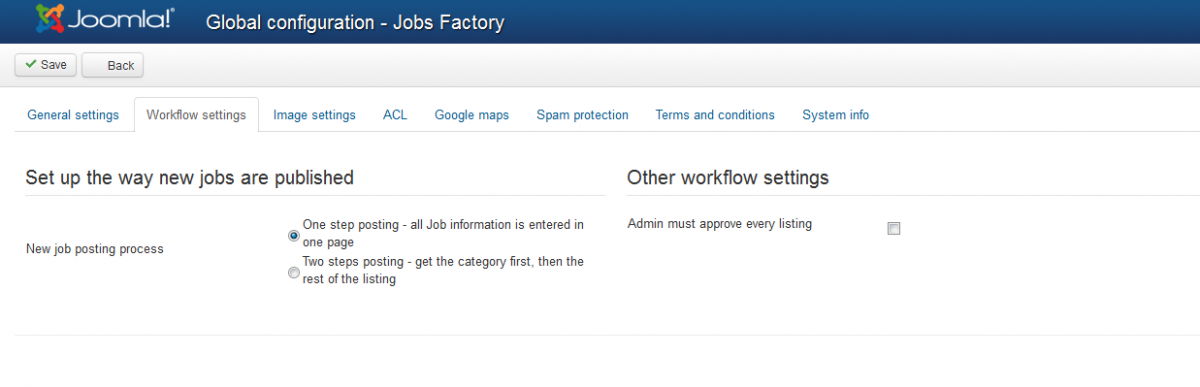
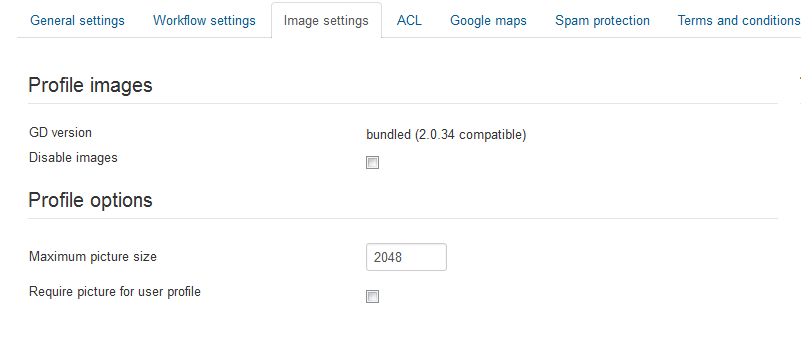
Image Settings
On the Profile images area you can view the current version of the graphic library and to Disable Images on profiles.
In case the images are enabled you can add a Maximum picture size and to choose if they are required for all users.
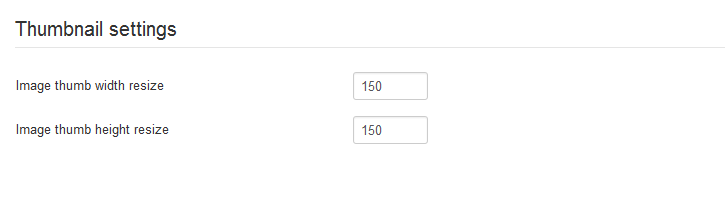
On the right side of this page you can add the image thumbnails resize values in width and height.
Google Maps
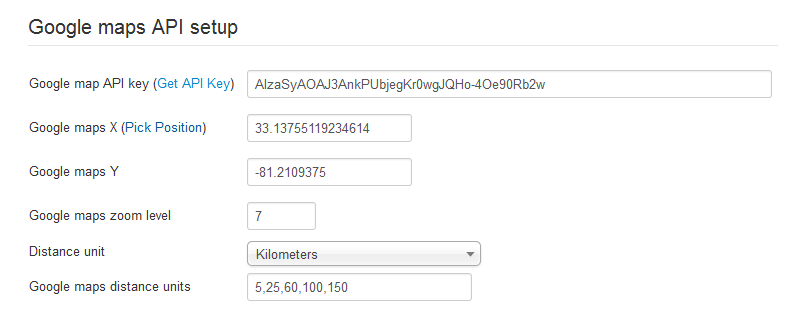
To have functional Google Maps on your website you will need an API key, to get one click on Get API Key and follow the instructions found there.
After you entered the API, you can define settings like the default position of the map by latitude and longitude and also the zoom level.
Below these you can select the distance unit(kilometers or miles) that will be displayed and the values for it.
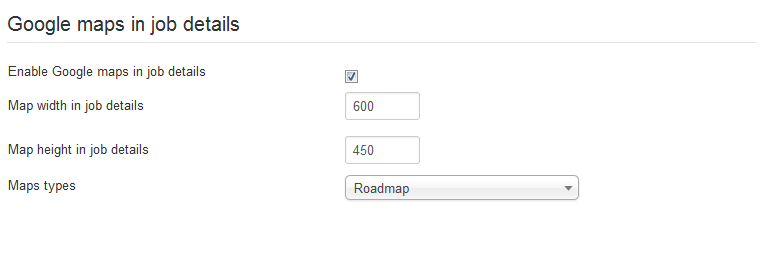
You can enable Google Maps to be showed in every job details page.
If enabled, you can define the width and height of the map for this section and select which type of map will be used (Roadmap, Hybrid, Satellite, Terrain).
Spam Protection
To protect your website against spam you can use one of the email protection methods available for our component, this tab allows you to set them up.
The reCaptcha Mailhide works the same way as regular reCaptcha, but it's used when users want to see email addresses. Other mail protection methods are Smarty and Joomla. Smarty obfuscates the source code with Javascript, and Joomla simply hides the email.
In case you choose reCaptcha Mailhide, you have to add a public and a private key, clicking on Get it here will take you to the ReCaptcha site to obtain your keys.

Terms and Conditions
This tab comes with a simple text editor where you can add Terms and conditions.
Users have to read and agree with the Terms & conditions by checking the tickbox every time they post job offers.
System Info
The System Info tab is implemented to provide basic information about the cache directory, upload directory or configuration file. These are required in order for the component to run properly, so make sure everything is green after installing Jobs Factory.

(!) After working on the smarty .tpl files, it is recommended to purge the cache so the changes can take effect right away.
Component Menu
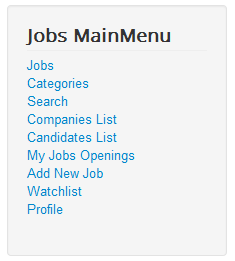
Jobs Factory's menu comes with many menu items that you can enable/disable or edit afterwards, here is an incomplete list of them:
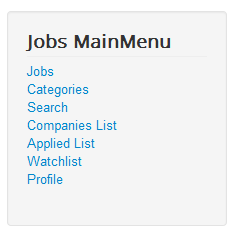
- Jobs - displays lists with all the active or archived job offers.
- Categories - displays lists with the available categories.
- Search - provides various search forms.
- Companies List - shows a list with all the companies who updated their profiles.
- Candidates List - shows a list with all the candidates who applied at least once for a job.
- My Jobs Openings - contains lists of your published, drafted or archived offers.
- Add New Job - the new job offer form, accessible only for Companies.
- Applied List - shows all the jobs where you have applied.
- Watchlist - displays lists with various items added to the watchlist.
- Profile - the place where companies and candidates can add specific details and also for companies to add funds used for the payment items.

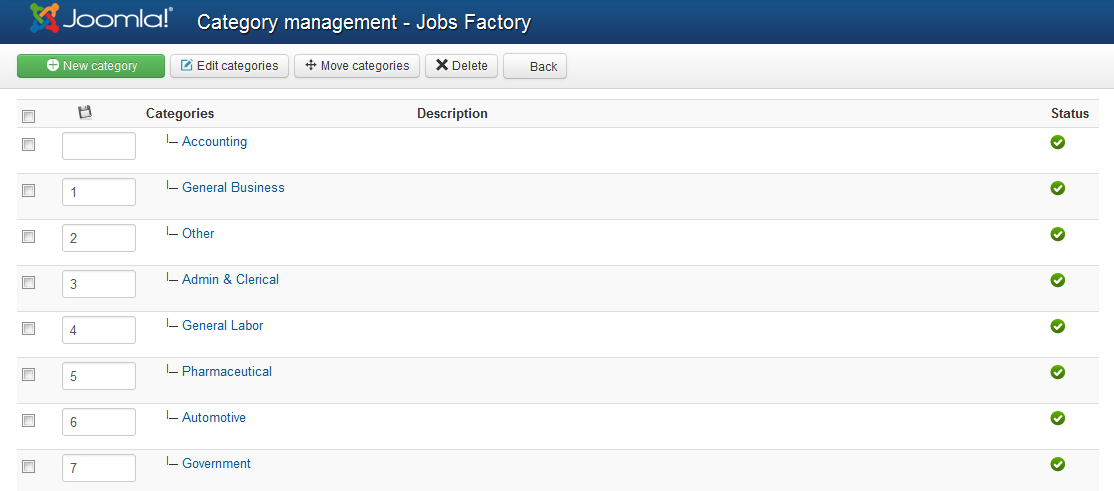
Manage Categories
Jobs can be grouped in diverse categories depending on what you have set on the backend.
Categories section of the Control Panel allows you to add new categories or to change their order.
The component supports unlimited category levels.
(!) Documentation based on Jobs Factory version 1.5.1