Table of Contents
User Guide
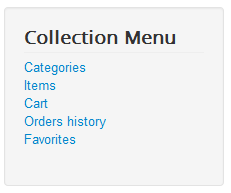
In order to have direct access to the component's menu items, the menu module should be published from the administration area. The menu module will display the Categories and Items links for site guests, while adding the Favorites, Cart and Orders history links for the logged in users.
Here is how the user menu will be displayed:
Categories
The administrator can choose regarding this page one of the 2 available styles of displaying the Categories: Default view or Modern View.
As a smart utility, the Category Module can also be published, which actually represents another option to display the category tree.
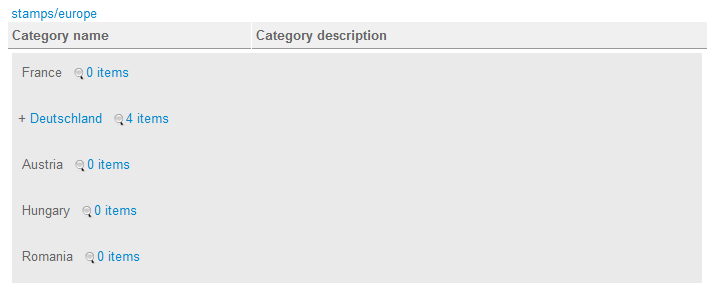
The Default view of the categories is a more simple approach to the category tree, displaying only the main categories then after pressing a certain category, displaying only the subcategories inside. On top of the page the category path is visible, patch which can be used to navigate back to the parent category.
The category description is also displayed on the right side. To enter a category press the category name and to view the correspondent items just click on the items counter which will load the items listing page. The display of the number of items can be enabled or disabled from the settings area.
The Modern view of the categories is a more complex approach to the category tree, offering a complete overview along with the stylish visual arrangements.
To enter a category simply press the category name. To view the correspondent items just click on the items counter next to their names to load the respective items listing page. Displaying the number of items can be enabled or disabled from the settings area.

Items
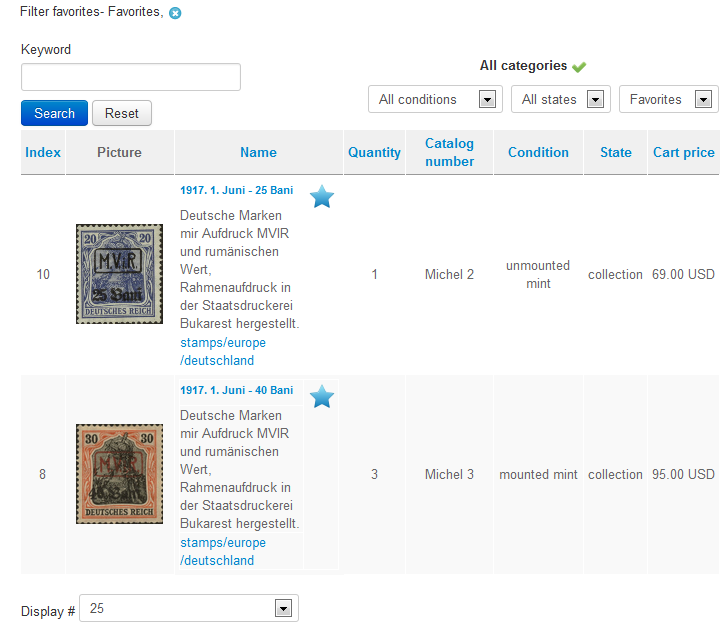
The Items page will display a listing of all the available items, depending on the selected filters: the search module or the search option are available at the top of the page, where both options can be enabled or disabled from the backend area. The search option enables the items filtering after a certain keyword, parent category, item condition or state. Click on the "X" mark next to the keywords to reset the search.
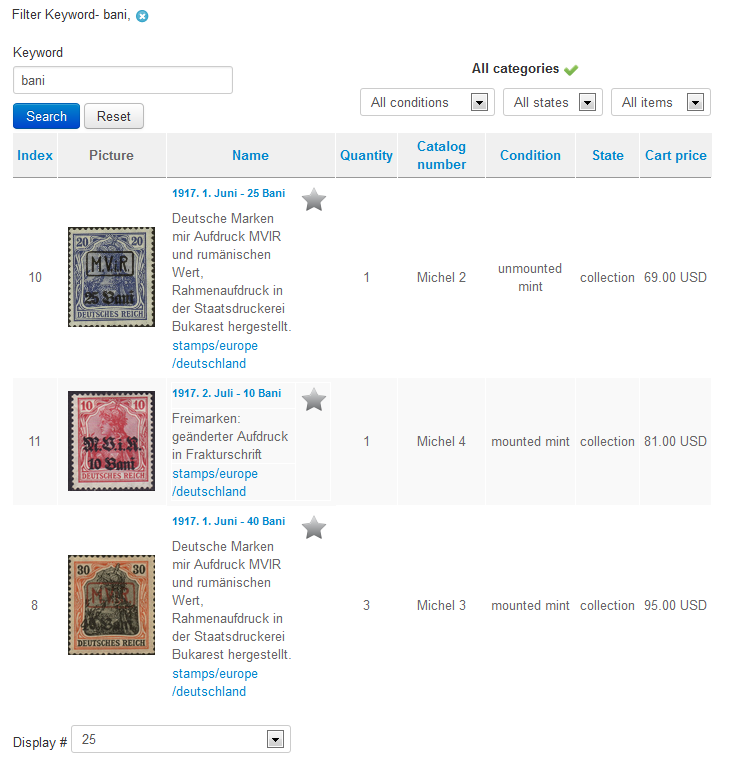
Clicking on the image or title of one of the items will display particular item details.
On top of the page, you will find the category pathway revealing the category parent of the selected item. Clicking on it will redirect you to a listing of the items from the respective category.
Item details such as Index, Catalog number, Condition, State or Quantity can be made visible or hidden, as well as setting their order.
Having the basket disabled from the administration area will hide the Add to cart button.
From the backend's General Settings you can also enable or disable the Requests button and also assign a proper email address for them.
Below all of these you will find the description of the item. If it has an empty description, this area will not be displayed, even if the description is set to visible.

By clicking on the Send request button will open a modal box displaying the send request form.
It is recommended that the ReCaptcha service is also enabled from the backend in order to minimize any spamming risk.
The index and item name will be automatically prefilled, as well as the email field, if the user is registered.
The potential customer can enter in the text field a desired question or request regarding that certain item, then enter the validation code if ReCaptcha is enabled.
By pressing the Send request button, the request will be received by the administrator on the special email address that he has set on the backend.

Cart
The Cart page is offering the user the possibility to acquire a certain desired item/items from your collection.
In order to buy an item, customers will have to click the Add to cart button. This will add the desired item to the cart, displaying the "Item was added to cart" information, allowing the user to keep on shopping. To proceed with the ordering, customers will have to click on the component menu on the Cart option. If not logged in or registered yet, the login form will be displayed.
When entering the Cart page, the Checkout form will be displayed initially, here the users will be able to do the following:
- Change the number of the items they wish to order. If a certain quantity is not available, a "Sorry, only X items are available!" will be displayed and the quantity will be automatically set to match the stock.
- Remove certain items if desired from the order
- Select between an Internal or External shipment
- Fill in the complete shipment address
- Select the desired payment method (Paypal, Moneybookers, 2Checkout, Bankwire or Sagepayments)
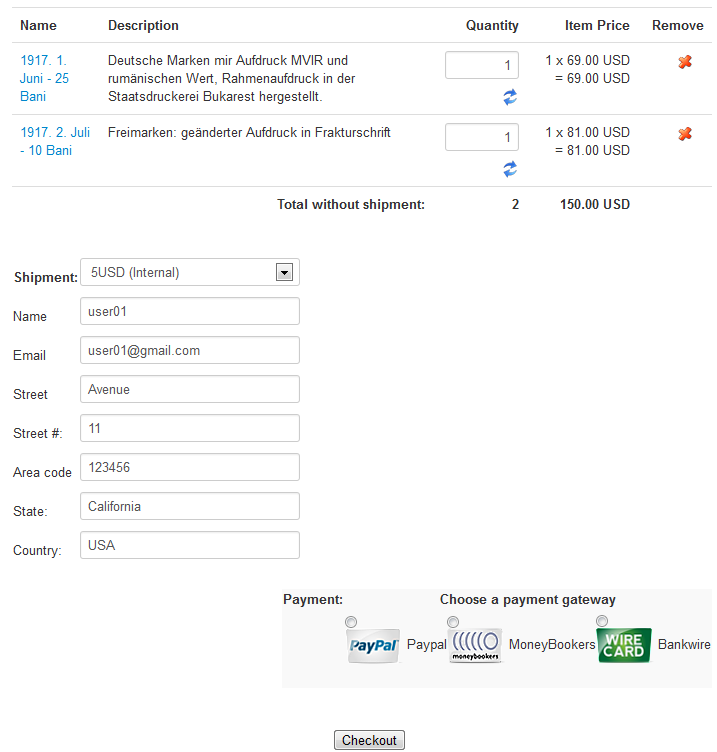
Afterward, to finish this stage, the customer will have to click on the Checkout button which will redirect him to a Confirmation page.
When landing on the confirmation page, the customer can verify all the information regarding his order, like the items he wishes to purchase, quantity, unit price, total price and the order total.
From here, he will also be able to choose one of the available gateways to process the payment (PayPal, Moneybookers, 2Checkout, Bankwire, Sagepayments). The list can different based on the backend configuration. Clicking on the logo of one of the gateways will redirect the customer to the payment processor pages to proceed with the payment.
Once the order is confirmed, the customer will automatically receive an email notification from the system and also the site administrator. In case of Bankwire however, the customer will receive the email notification containing the bank account information where the payment has to be made.
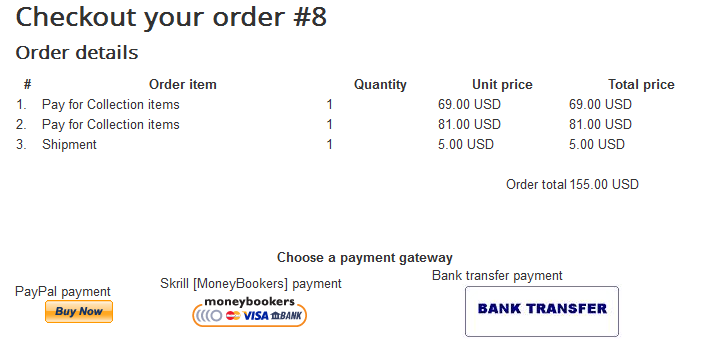
After doing all of these, the order will be registered as pending and will be visible for the user with that status on the Orders History page, and for admin on the Payments/Orders page. After the payment is confirmed, the administrator can change the status of the order from Pending to Confirmed.
In case the customer already had enough funds in his balance, the payment will be processed automatically, without needing any assistance from the backend for this order.
After the payment was confirmed, the administrator can prepare the package and send the desired collection items.
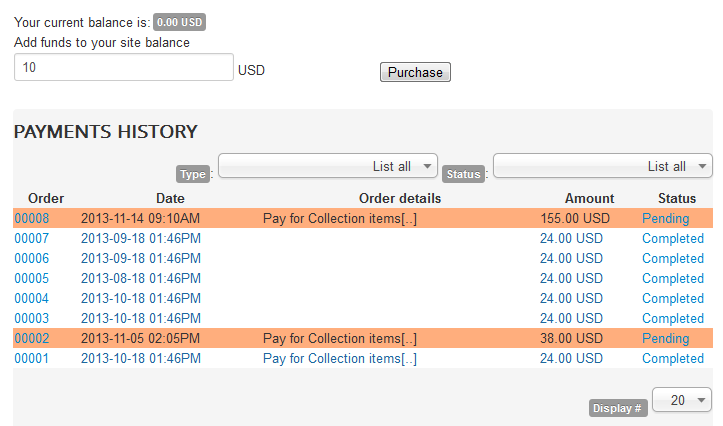
Orders History
The Orders History page will display for the logged-in customer all of his orders together along with the order id, date of order, amount and status.
A filtering system is present here, which will display the orders after a certain Type (Withdraw or Paid) or Status (Completed, Pending, Canceled).
On top of the page you will be able to see your current balance along with a field where you can enter the number of funds you wish to add to it.
Add the desired amount on the available field and click the Purchase button, this will redirect you to the Checkout page to buy the respective amount.
Favorites
The Favorites page displays a list of the items that the customer has added to his wishlist. This is done so that he can reach those respective items with ease.
To add one item to this list, the customer has to click on the ![]() icon found on listings or on the item details page.
icon found on listings or on the item details page.
The listing also has the search and filtering options available, if enabled from the backend.
(!) Documentation based on Collection Factory version 4.1.8