Table of Contents
Configuration
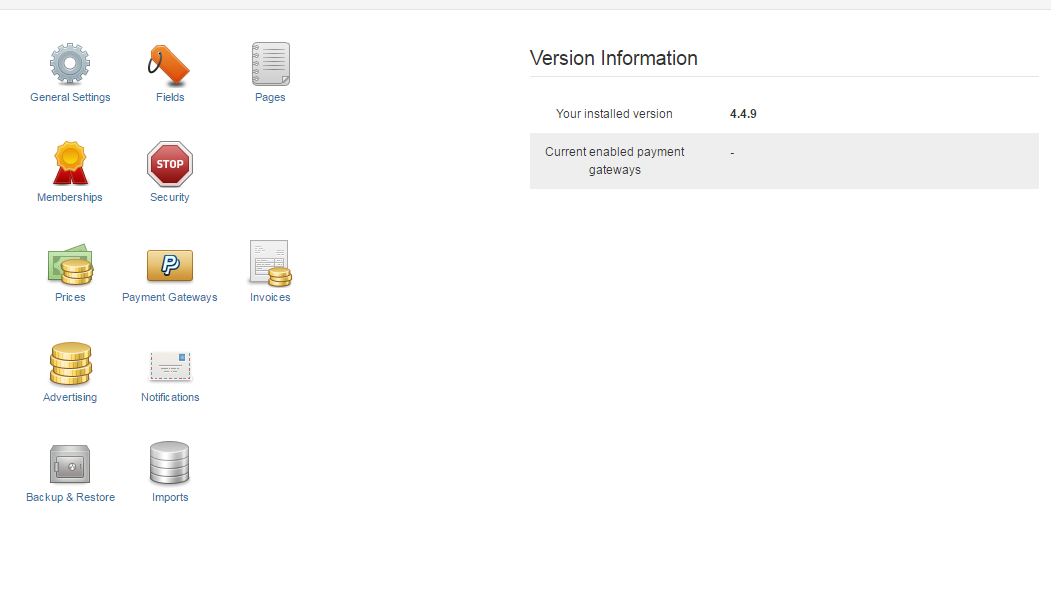
Love Factory is a dating and matchmaking extension for Joomla, with fully editable member pages and configurable fields along with multiple social networking features.
To edit some of these features go to Components/Love Factory/Settings in Joomla's backend and click on General Settings.
General
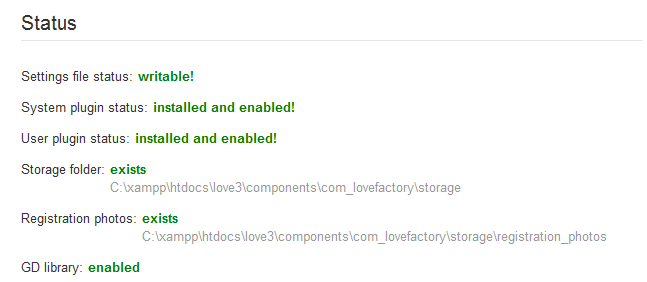
Status
The Status section is implemented to provide basic information about the storage folders, settings and required plugins. These are required in order for the component to run properly, so make sure everything is green after installing Love Factory.
General
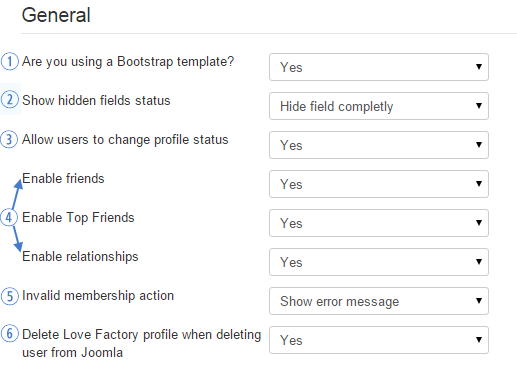
1. Enable Are you using a Bootstrap template? in case you have a template that loads bootstrap files.
2. With Show hidden fields status you can let users hide specific fields from their profile by toggling the status or simply hide them completely.
3. Enabling Allow users to change profile status gives users the possibility to switch their profile status to Online, Offline or Only for friends.
4. Depending on your website preferences you can allow users to make Friends, Top friends or enter Relationships by toggling these options Yes.
5. With Love Factory you can restrict users from doing certain actions and create specific Membership Plans that unblock these actions while still providing income for your website. In case a user does an invalid action regarding his current membership status you can either display an error message or redirect him to the Membership Plans page.
6. To have a clean database and to manage the users easier, you can enable the option to automatically Delete Love Factory profile when deleting user from Joomla. This will require the Factory User plugin to be enabled.
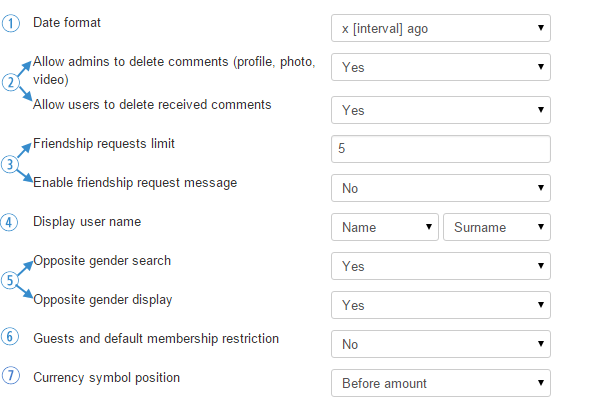
1. You can change the used Date Format within Love Factory on your website. In case you do not like any of the formats implemented, you can set a custom one. “d” stands for Day, “m” for Month and “Y” for year. “H:i” is for a 24-hour representation of time, while “h:iA” is for a 12-hour format. Clicking on more info will link you to the PHP manual for custom formats.
2. Set or remove restrictions regarding comments, such as Allowing admins to delete comments or Users to delete received comments.
3. Enter the number of friendship requests per day a user can send to another user on the Friendship requests limit field. You can also enable a message that will be sent to the users that receives the request. Be sure to define it from the Notifications page.
4. Select how to Display the user name throughout the component. If nothing is selected, the displayed default username will be the Joomla! username. It is important to know that the new display username will be used only after the user re-saves the profile!
5. Display and search for only the opposite gender members on the following pages by enabling Opposite gender search: Search, Search for a match, Online users, Radius search and Members map.
By enabling Opposite gender display will allow users to access profiles only for opposite genders.
To configure the opposite genders for your website, you must go to Components/Love Factory/Settings/Fields/Gender. For more information about this please check this section.
6. Guests and default membership restriction: If enabled, guests and users with default membership will be restricted to access the extension. They will have to register / login and purchase a membership before they can use the extension. This setting will override other restrictions.
7. Currency symbol position: Select where the currency symbol will be placed for every price: Before or After the amount.
Registration
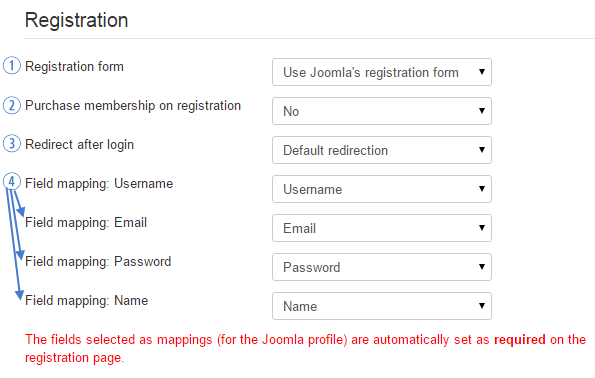
1. On the Registration area you can choose the registration process which will be used on your website: Joomla standard registration form or Love Factory form:
- If you use the Joomla registration form, when registering, only a Joomla user profile will be created. When the user tries to access a section of the component that requires them a Love Factory profile, he will be presented with a fill-in profile form. After filling in their profile, the Love Factory profile is created.
- If you use the Love Factory registration form, when registering, you will create both Joomla and Love Factory profiled. Users will not have to fill-in their profile as in the standard registration form since it covers all required fields.
(!) In order to have either of the above forms enabled for users, you will need to verify if the Allow User Registration is enabled. To do so you will need to go to System/Global Configuration/Users
(!) In case you choose the Love Factory registration, you must have the Lovefactory Plugin enabled!
2. Enabling Purchase membership on registration will redirect the user to the payment gateway to purchase the desired membership, once he filled in all the personal information on the registration page.
In order for this feature to work, it is required to have the "Registration form" set to Love Factory's registration form.
Another important aspect is to create the Price and Gateway fields and to assign them to the Registration page. Please check our Custom Fields & Pages Guide to find out how to implement these fields.
3. Redirect after login option allows you to choose a specific redirect page for users upon logging in.
4. Field mapping settings will help you assign the Joomla registration fields into Love Factory ones. You can select the fields that will be used as username, email, password and name when registering a new profile.
Profile fill-in reminder
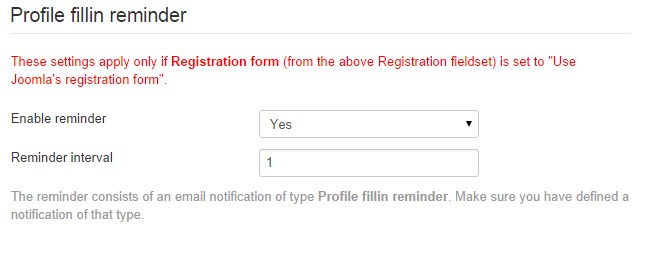
In case you plan to use the standard Joomla registration form you can create a reminder from the Notifications page, which will be sent to users that have yet to fill their profiles.
To enable the notification, be sure to set "Yes" on Enable reminder and to enter the interval (in days) when the notification will be sent.
Profile fill in no longer means that they have a Love Factory profile or not.
It means they have not updated their profile using the Profile Fill In page. Using this page, you can request more information. The registration form can be simple, but the Profile Fill In can be more complex to ask for more information.
You can set on the Security page what sections of the extension requires them to have a "FilledIn" profile to allow them access to those sections.
Groups
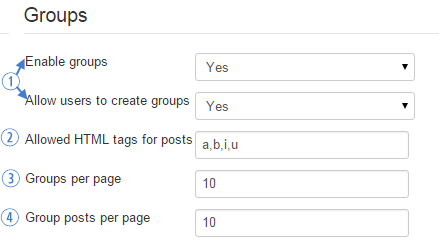
1. By enabling Groups feature and the Allow users to create groups settings will let users create groups and join, as well as to interact with each other by making threads visible to the users in the respective group.
2. Allowed HTML tags for posts option gives you the possibility to enable various HTML codes that users can use in their posts.
3. You can edit how many Groups per page will be visible when you are on the Groups page on the front end.
4. Group posts per page option allows you to set a defined limit for posts per page on the threads made by users.
Approvals
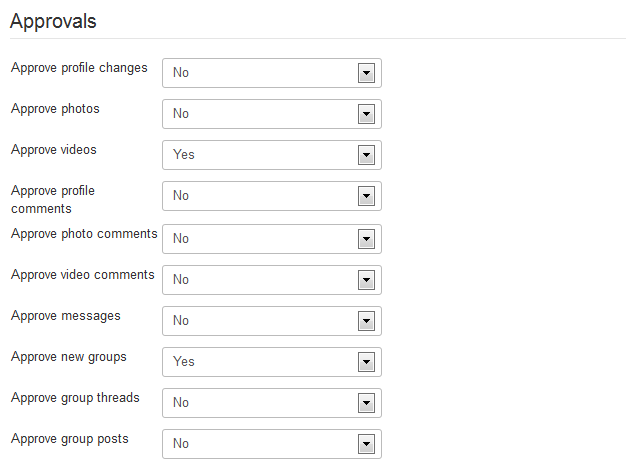
The Approvals section is where you can set which actions made on the frontend will require approval from the administrator.
Upon enabling one of these, the Approvals page will become available on backend.
Here is a list of the available actions:
- Approve profile changes
- Approve photos
- Approve videos
- Approve profile comments
- Approve photo comments
- Approve video comments
- Approve messages
- Approve new groups
- Approve group threads
- Approve group posts
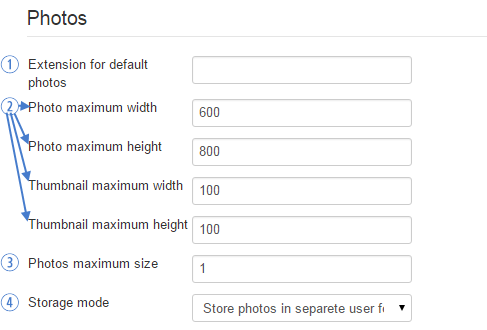
Photos
1. On the Photos section you can set a specific Extension for default photos. In case you want the default member photo to be personalized on the user's gender, you can upload an image with the designated ID of the gender in the "[joomla]/media/com_lovefactory/storage/defaults" folder.
The IDs for the default genders are as follows:
Male → 0
Female → 1
Couple → 2
However, this list can be different depending on how you manage the genders (Components/Love Factory/Settings/Fields/Gender).
As an example, you can upload a photo named "1.jpg" for males on the mentioned folder and to add the ".jpg" value on the field.
2. Define the Maximum size of width and height of the photos uploaded by the users or of their thumbnails.
3. Photos maximum size is where you can set a limit (in MB) for the size of the uploaded photos.
4. Storage mode allows you to either store all photos in the same folder or to store them in separate folders for each user.
Page Settings
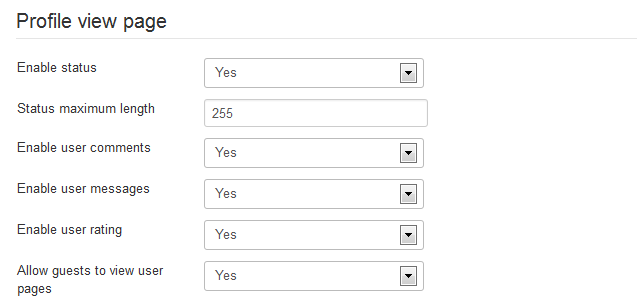
Profile View Page
From the Page Settings tab you can enable or disable features available for specific pages within the component.
Users can set a profile Status, similar to Facebook status. From here you can enable or disable this feature. If enabled, you can also set a Maximum length for it.
Other features that you can enable here are:
- User comments
- User messages
- User rating
- User rating update
- Allow guests to view user pages
3. With the user rating system enabled, you can also let users update the rating they gave manually, whenever they want.
Remove user awarded ratings on profile remove will delete all the awarded ratings by the user who got removed.
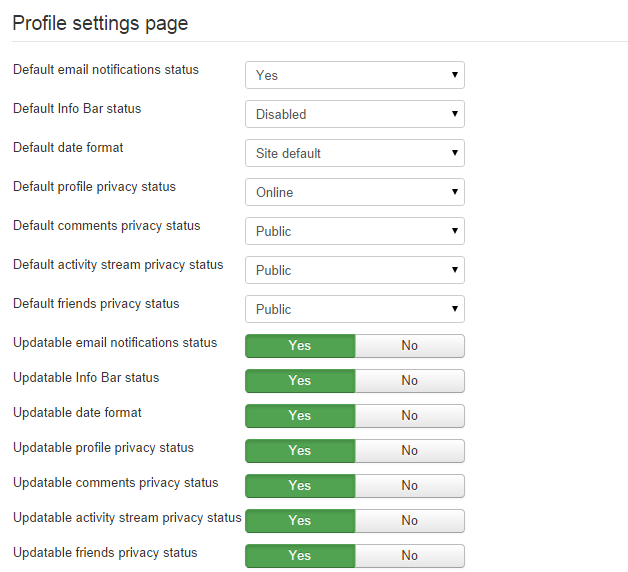
Profile settings page
The profile pages of users for Love Factory comes with many features. Here you can change the default state of the following:
- Email notifications status
- Info Bar status
- Date format
- Profile privacy status
- Comments privacy
- Activity stream privacy
- Friends privacy
Besides having their default status, you can allow users to change them manually from their Profile Settings page found on the frontend.
In the case of Info Bar, you will need to enable it first from Info Bar & Shoutbox tab and then set Default Info Bar status from this fieldset to Top or Bottom. This way it will be available for all new users.
From this fieldset, you can also set if the value can be changed later by the users by setting the Updatable Info Bar status to Yes or No.
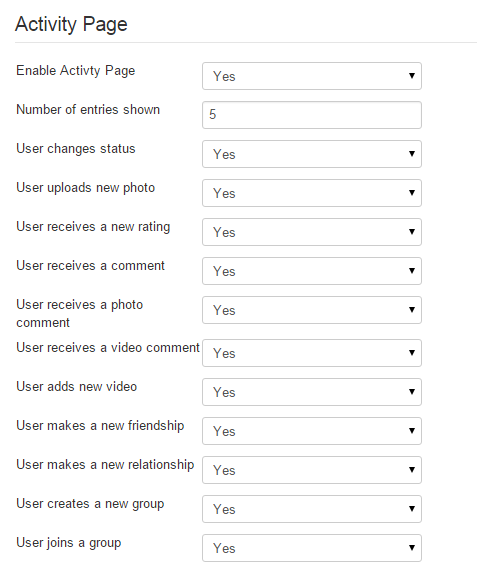
Activity Page
The Activity Page section allows you to enable and manage the Activity Stream page that can be found on the profile of each user, displaying a short history of the recent actions made by said user.
Once the stream is enabled, you also need the Love Factory Activity Plugin enabled in order for the actions to be registered on frontend.
Back on the settings page, you can set up the Maximum number of entries shown and which actions are to be displayed on the Activity Stream:
- User changes status
- User uploads new photo / new photo is approved
- User receives a new rating
- User receives a profile comment / profile comment approved
- User receives a photo comment / photo comment approved
- User receives a video comment / video comment approved
- User adds new video / new video is approved
- User makes a new friendship
- User makes a new relationship
- User creates a new group
- User joins a group
As displayed on the list above, some activity notifications will be displayed only upon approval. If the approval system is enabled for them, you can check this here.
When one of the following actions occurs, their respective notification will also be removed from the Activity Stream:
- Photo removed
- Video removed
- Friendship removed
- Relationship removed
- Group removed
Members' Map Page
From the Members Map Page area, you can enable or disable the Members Map feature. This page displays the location of the users by using Google Maps. For this page to work properly, you will need to activate Google Maps on your website. More info on this on our Love Factory - Integrations Guide.
Allow guests to use this page will let you grant access or deny it for guests to use Members map page. In case you denied the access for them, they will be informed that they need to log in first, in order to access the page.
With more members being in a close proximity of each other, you can group them together, having a cleaner display of the map. Enable Group members for this and set a Maximum zoom level.
Clicking or hovering on the grouped members will display them. Set Grouped members to display them on the map or on a new page.
You can disable Show members with default membership to hide them on the map, being another reason for them to upgrade their membership.
Choose the display behavior of the profiles. Enable/disable Open profile links in new window and when to show them: on mouse hover or on mouse click with the When to show user profile option.
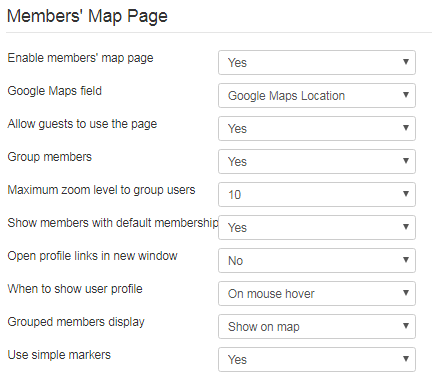
You can now choose to Use simple markers, instead of the default ones. Use this feature when there are too many results to be displayed on map. This will improve the performance within your website.
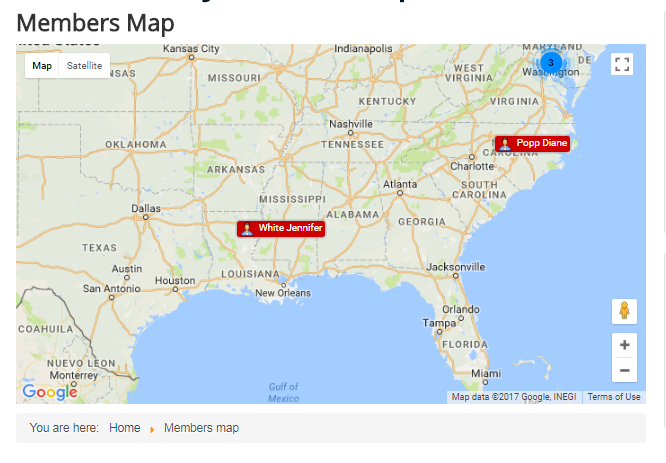
This is how the markers will be displayed on the map without the simple markers option enabled:
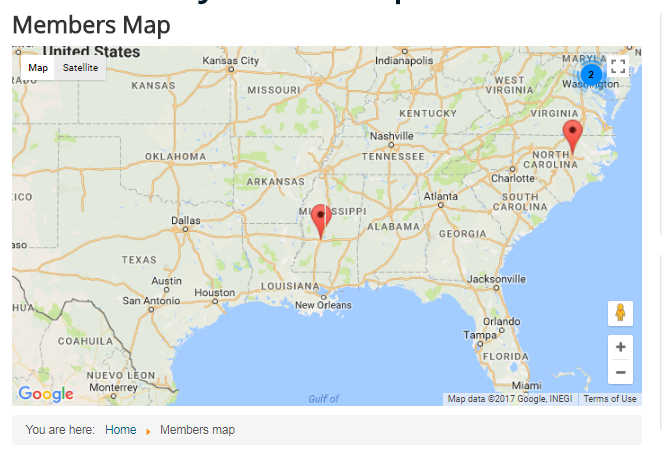
By enabling the simple markers option, the markers will look like this:
Create Profile
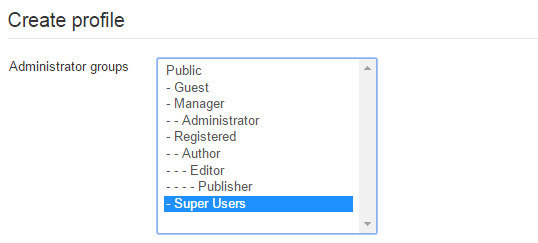
A new feature for Love Factory is available on version 4.3.6 makes possible for the Administrator and his staff to Create new user profiles from both backend and frontend.
In order to do this, you will need to select the user group(s) allowed for this action.
Once set, the assigned user groups will be able to create user profiles as follows:
- from backend: by going to Users page and clicking on the New button.
- from frontend: by adding the Create profile menu item from backend to one of the menus on frontend.
Search Page
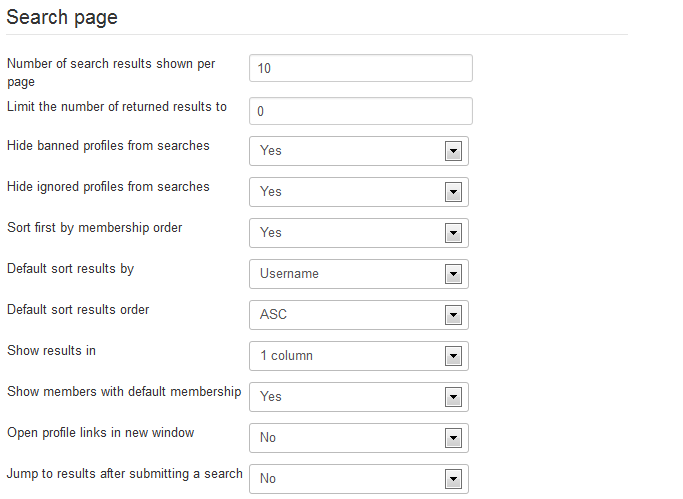
You can edit the Search Page to Show a specific number of search results per page by adding an appropriate value.
Limit the number of returned results helps you reduce the server load by entering a maximum number of results a search can find. Adding "0" will display all of them.
You can Hide banned or Ignored users from the searches by toggling these 2 options to Yes/No.
Sort first by membership order set to No - applies the sorting values that are selected on front end by the user who is performing the search (Username, Rating, Last Seen and Asc or Desc)
Sort first by membership order set to Yes - applies the sorting values, but, first, considers the Love Factory memberships of the respective users.
As an example, if you perform the search for "Last seen" and "Desc", in case it will find 2 Basic users and 2 Expert users, it will display the 2 Expert users (sorted between them by "last seen" criteria) first and then the 2 Basic ones (also sorted between them by "last seen" criteria).
The Default sort results can be set by "Username", "Profile rating" or "Last seen".
You can also modify the Default sort results order to be either ascending or descending.
Show results in will allow you to change the display of the searches, in 1 column or 2 columns.
You have the option to Show members with default membership on the searches or to hide them, making another reason for them to upgrade their membership.
Other options found here that change the behavior of the search section are to Open profile links in new window and to Jump to results after submitting a search.
Search Radius Page
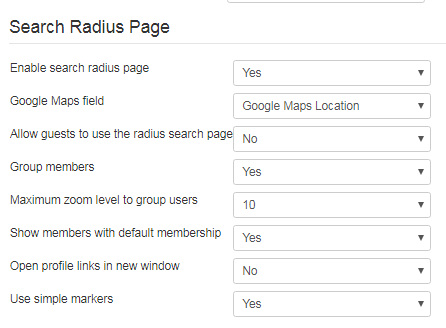
Next section is named Search Radius Page. You can find this page as a tab in the Search page. For this tab to work properly, you will need to activate Google Maps on your website. More on this on our Love Factory - Integrations Guide.
First, you need to Enable the search radius page and assign the mapping field for it.
Allow guests to use the radius search page will let you grant or restrict access for guests for using the Search Radius page.
You can enable Group members so that, when more users are in a close proximity of each other, it will create a popup to easily display all of them. You can also set a Maximum zoom level for this to happen.
You have the option to Show members with default membership on the map or to hide them, giving them another reason for to upgrade their membership.
With Open profile links in new window you can choose to either open a new window when clicking on a search result or to redirect the respective window to it.
You can now choose to Use simple markers, instead of the default ones. Use this feature when there are too many results to be displayed on the map. This will improve the performance of your website.
Videos Gallery Page
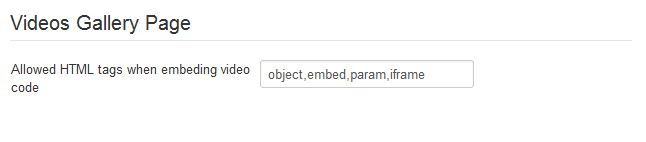
In the Video Gallery Page settings you can add which HTML tags are allowed when users embed video codes.
Interactions
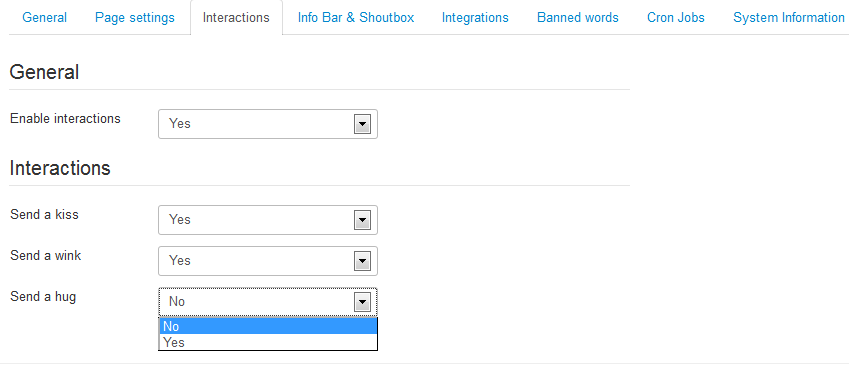
In this tab you can Enable interactions between users such as Kiss, Wink or Hug.
If enabled, users can verify these interactions from the Inbox menu and by clicking on the Interactions tab.
In case you want to activate only one of them simply toggle to "No" the other ones.
To use your custom icons for the interactions links, place in [Joomla folder]\media\com_lovefactory\storage\interactions the images you want to use named, as follows: kiss.extension, wink.extension, hug.extension. For extension, you can use png, jpg or gif files .
For example, if you add kiss.png, then that image will be used as the icon for the kiss interaction.
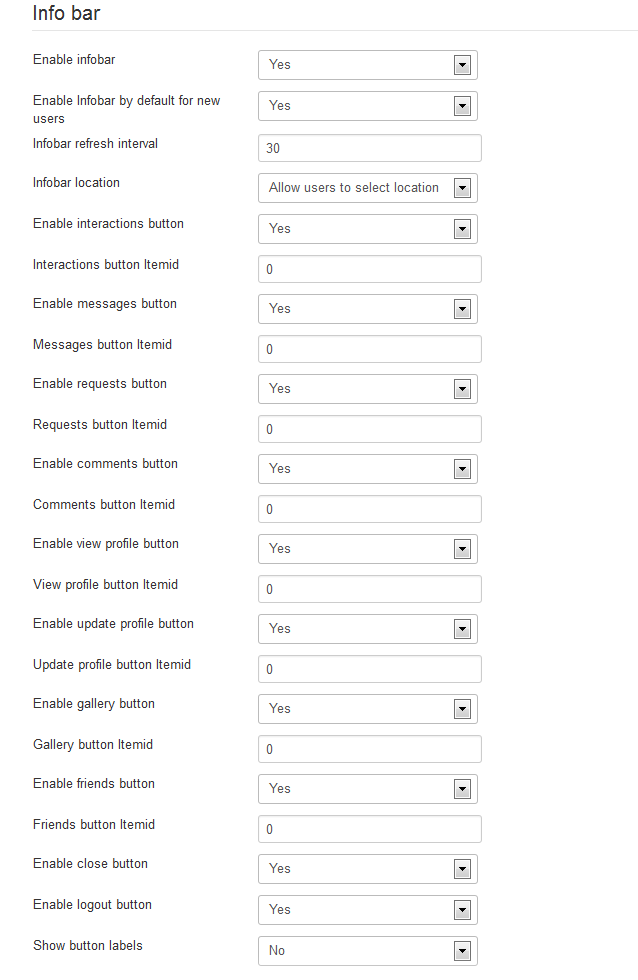
Info Bar & Shoutbox
The Info Bar contains shortcuts to various sections of the web page and displays information about new messages, interactions or new friend requests. If enabled, you can change many settings such as the refresh rate and which buttons will be displayed on the bar.
You also need to have Love Factory Plugin enabled to use Info Bar.
(!) Please take note that the field Infobar location is obsolete and will be removed in the next build of the component. Instead of this please use the Default Info Bar status found on the Profile settings page.
You have various buttons that can be displayed on the Info Bar and that you can enable or disable individually, here is a list of them:
- Interactions button
- Messages button
- Requests button
- Comments button
- View profile button
- Update profile button
- Gallery button
- Friends button
- Close Infobar button
- Logout button
Show button labels gives you the option to show or hide the names of the buttons next to their icons.
The Shoutbox allows users to communicate instantly as a group. Enable it to activate all the settings.
You also need to have Love Factory Shoutbox module enabled in order for it to work.
Number of messages to show lets you define a maximum number of messages to be displayed on the Shoutbox.
By enabling Log shoutbox messages, a log will be created containing all of the messages written on it. Below this, in case you enabled the option, you can later download the log or remove all of the details.
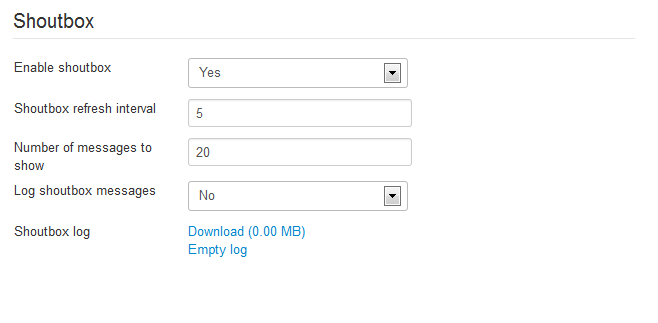
(!) The refresh interval for both these features should be set with caution, since a high refresh rate can lead to high server loads.
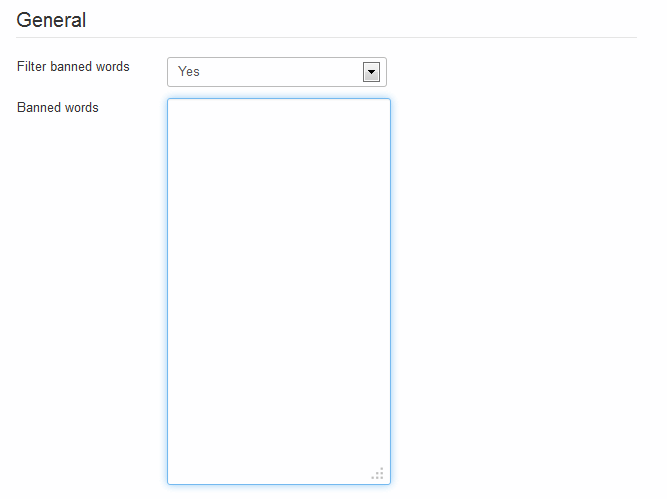
Banned words
In this tab you can filter specific banned words by enabling the option and adding the words in the text area. Add one word per lane in lowercase.
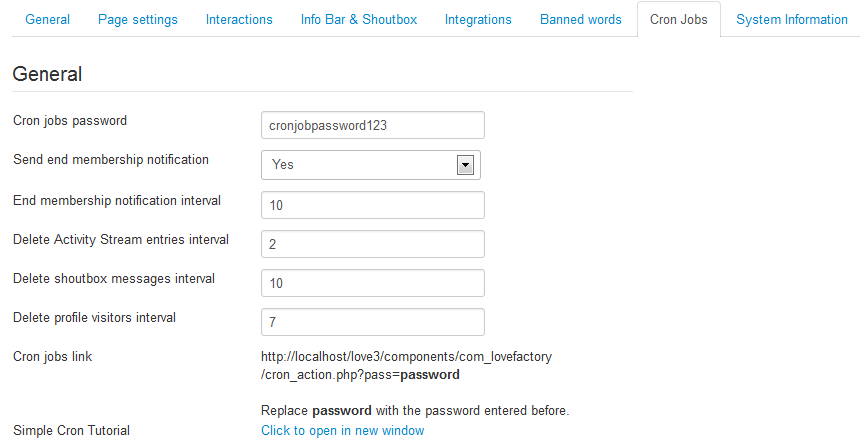
CRON Jobs
Under the CRON Jobs tab you have some tasks along with a link to a simple CRON tutorial.
Send end membership notification, if enabled, will send a notification to the user via email when his membership is about to expire.
You can define the number of days before the membership expires to send the notification.
With CRON jobs you can also choose to delete activity entries, shoutbox messages or profile visitors at specific intervals of time.
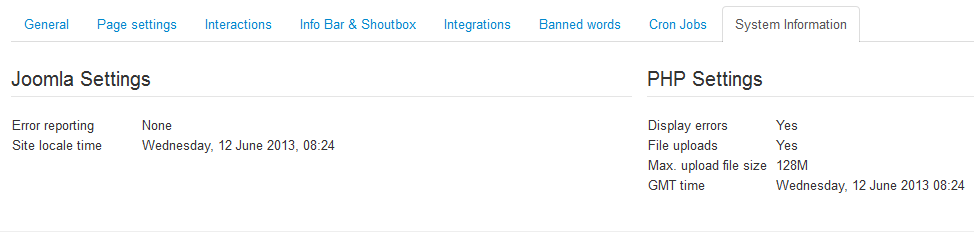
System Information
In this last tab you will find various informations about some Joomla and PHP settings.
Fields
Love Factory comes with a variety of fields which are assigned to the pages of the component. To configure them go to Components/Love Factory/Settings/Fields.
Additional settings can be found for some of these fields on the Parameters slider on the right side of the details page.
Custom fields and pages can also be created and managed from this area. For more guidance regarding this, visit our Love Factory - Custom Fields & Pages Guide.
About me
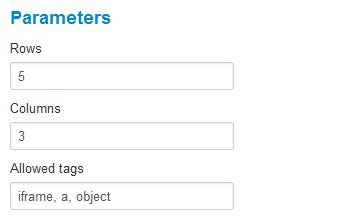
You can set up the size of the About Me field by adding the number of Rows and Columns available on it.
Enter, separated by comma, which Tags are allowed on the text area. Tags are very important since searches within the site make the search looking after these exact words. Don't put too many tags, since this will make them pop up in every search.
City
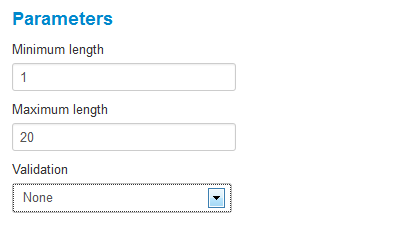
Add a Maximum and Minimum Length of the city field, leave empty for no limit.
Select if you wish to add a validation on the field, Numeric or Custom regexp validations being available for it.

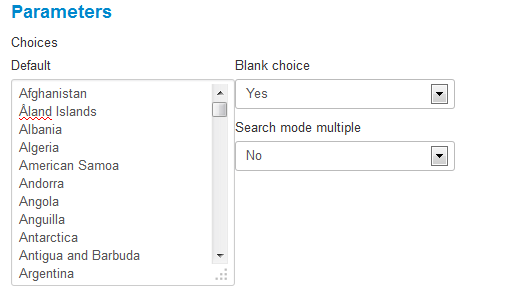
Country
Modify the names of the countries. A text area will be available for each new language added to your website. Add one country per line.
The Blank choice will allow you to add a blank value as the first choice above all country names.
Search mode multiple will allow the field multiple options to be selected when used on the search page.
Date of Birth
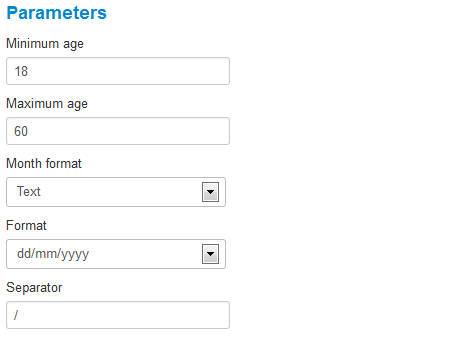
The Date of Birth field can be set to allow users to add their age within a certain radius with the Minimum age and Maximum age parameters. This way, the year list for birthdate will be adjusted to contain only the years in between the minimum and maximum age, according to the current year.
Change the display Format of the field to either dd/mm/yyyy or dd/mm/yyyy, as well as choosing a text or numeric Month format.
You can also set the Separator between days, months and years.
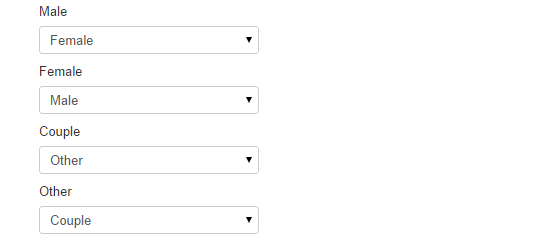
Gender
The Parameters section of the Gender field allows you to set the available genders on the Love Factory component for every available language. Enter one option per line.
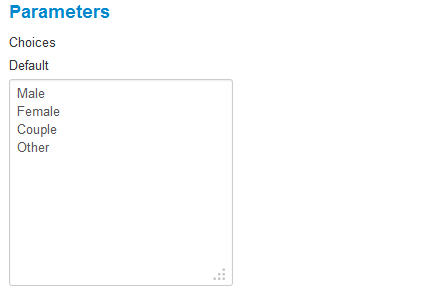
Since you can choose to display only the opposite genders on the component as well as the Members module, you must assign said genders one by one from this area, as seen in the picture below.
For example, you can choose "Female" as the opposite for "Male".
Here for
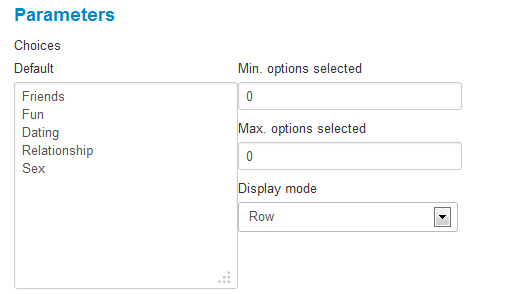
The same as for the gender field, you can modify the list of choices for the Here for field.
You can make this a requirement by adding on Min. options selected a value bigger than 0. For Max. options selected you can enter the maximum number of choices that can be selected in order for the field to be valid.
Choose the Display Mode of the choices to be either in a Row or in a Line.
Looking for
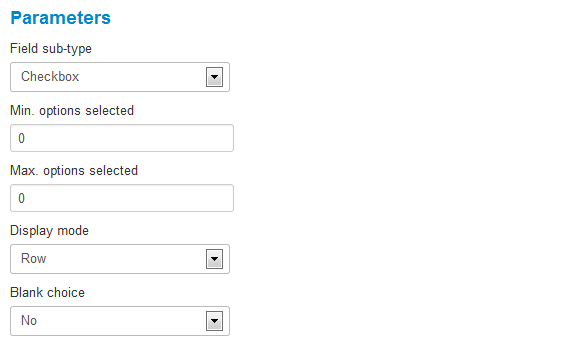
You can choose the type of the field from the following:
- Select
- Radio
- SelectMultiple
- Checkbox
Add restrictions to this field by entering the minimum and maximum number of choices to be selected in order for the field to be valid.
Choose the Display Mode of the choices to be either in a Row or in a Line.
The Blank choice will allow you to add a blank value on the top of the list.
Name & Surname
You can set a minimum and a maximum length of the Name and Surname fields.
Select if you wish to add a validation on the fields, Numeric or Custom regexp validations being available.
Relationship Status
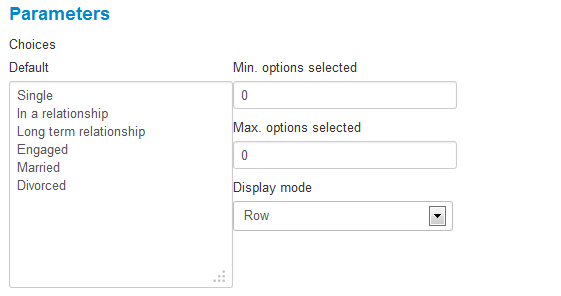
You can modify the list of choices for the Relationship status field.
If needed, you can make this a requirement by adding on Min. options selected a value bigger than 0. For Max. options selected you can enter the maximum number of choices that can be selected in order for the field to be valid.
Choose the Display Mode of the choices to be either in a Row or in a Line.
Username
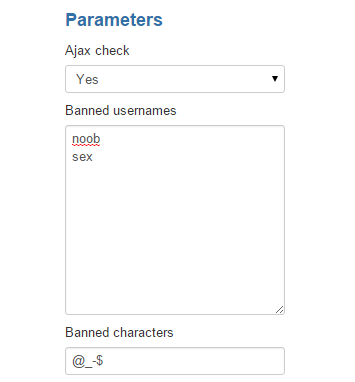
Ajax check enabled will check if the username is available before submitting the registration form.
Enter Banned usernames which you consider offensive. This will notify the users that they are not allowed with said username upon registering.
Banned characters allows you to add various characters on the list which you find inappropriate. These will be removed from the username once the registration process of said user is completed.
Component Menu
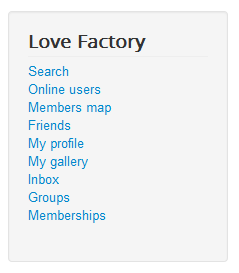
Love Factory's menu comes with many items that you can enable/disable or edit afterwards. Here are just some of them:
- Search - Displays a search form for users.
- Online users - Displays all the users currently navigating the website.
- Members Map - Displays Google maps where you can see other user's location.
- Friends - Displays list of friends, top friends, requests and more.
- My Profile - Displays the page where you can check your profile and edit your details.
- My Gallery - Displays the place where you view your uploaded photos and videos and add new ones.
- Inbox - Displays a page with all the messages and interactions you received or sent.
- Groups - Displays the list of all the groups that have been made.
- Memberships - Displays the page where you can buy a new membership plan.
(!) Documentation based on Love Factory version 4.4.9